Mickspace.net
IT Consultant
Create a Wireless Hosted Network Windows 7
With Netsh command line
Below you will find instructions how to set up and use this feature.
I read about this sometime ago, and since that time, searching now produces all sorts of instructions on this. Some good some bad, I hope this will be one of the good ones. I am giving the the command line way to set this up, apparently there is a thing you can download now to do this. Connectify and Connectify PRO, The pro version is $29.95. Why would I want to download more stuff and give someone $29.95 when I can can accomplish this in a few easy steps? I wouldn't and here is how to accomplish this.
After researching this again recently, I have found different conflicting ways to accomplish this, I have tried a few different ways, the instruction below is how I accomplished this with my PC.
Results my vary, depending on your PC setup, In this guide I am using Windows 7 32 Bit Ultimate Edition, with complete administrative rights.
Some older Wireless Network cards will not install the Virtual WiFi Miniport Adapter, most newer Wireless NIC cards will install the adapter if the drivers are installed from the manufacture. If the Vwifi adapter is not available you will need to have this installed before proceeding. Your PC must have a Wireless NIC card installed to be able to Broadcast a signal.
Continuing to read and attempting the following instruction, you accept this web site and its owner is in no way responsible for any damage that might occur to your PC, Network Interface Cards, Network Components, Servers, or what ever Device might have a problem in the future.
If you do not agree to take responsibility for your actions, Please Leave Now.
Step 1: Is the MS Vwifi mini adaptor installed, and Enabling Internet Connection Sharing ( ICS )
Before we begin, two things that are helpful to have open Command Window and Notepad.
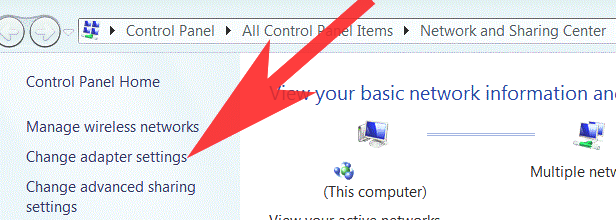
- Click Start - > Go to -> Control Panel\Network and Sharing Center there are a different ways to get to this, this is the simplest to explain
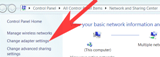
On the Left side menu, Choose "Change Adapter Settings". Once Open you should see all available Lan, Wlan adapters.
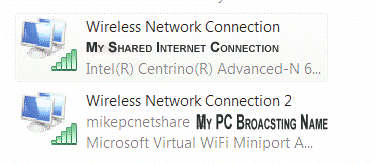
- The PC must have Microsoft Virtual WiFi Miniport Adapter installed it will appear in the list of adapters if available.
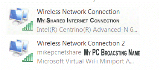 Right click on the adapter which is used as your internet connection, Lan or Wifi Adapter ( do not select the Virtual wifi adapter ) choose Properties at the bottom of the Pop up Menu.
( USB Connections or Tethered Connections to Cellular Phones and Air Cards will have a connection here as well, If your tethered device is not showing an adapter connection, connect the device and initiate connection to the internet, it should then show the device connection, These devices will sometimes remove the adapter after disconnection )
-
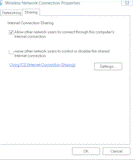 Choose the Second Tab, Sharing, Select the top Check Box. Click Ok
 ( Second Check Box - Allow users to connect ) I normally do not select the second check box as this will allow uses to control the connection. This feature is useful if you have to Dial Out to Connect, example would be an Air Card, or Using a modem such as a Dial Up Modem. This will allow a user on the network to initiate a connection thorough the Hosting PC. I am using Broadband, I do not have to Dial out, this not useful for my purpose. If you do have a Dialing out connection you will want to check this box. ( Cellular Air Cards use Dial Out, just as the old modems used Dialing )
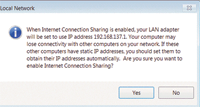 After clicking Ok, you might get the pop up message about your adapter changing, this is the default Shared IP address, which will be assigned to the adapter. Click Yes.
Later when you connect a device, the IP address of the connected device on the shared connection should show 192.168.137.xxx
Close the Adapter settings Proprieties box.
I recommend minimizing the "Network and Sharing Center" window to the task bar as we will need to Open again later.
from cmd prompt - " control.exe /name Microsoft.NetworkAndSharingCenter " (this will be handy later)


Step 2: Enabling Vwifi
-
Open a Command Window
Click Start (windows menu Button) type in the search box type CMD and a command window should open.
My User account is set up as Administrator, I can not verify if one needs to be Admin to do this? If you find you do need to be administrator, go to C:\Windows\System32\cmd.exe Right click on CMD.exe and select Run As Administrator.
- Below in red text is what is need to set up and start the service.
( yes that simple line )
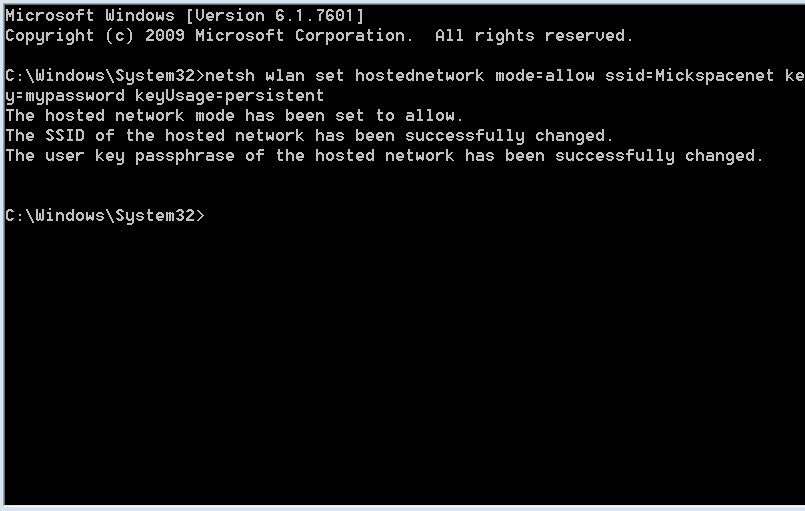
Change only these two parts in the string, Broadcast Name "SSID=Mickspacenet" and Password "key=mypassword"
Following the SSID= change to what you would like your Broadcasting name to become.
Following the key= change to what you would like your Key or password to be. If you do not change this and simply copy and paste these lines your ssid and key will be what is shown here. Once you changed to what you like, copy and paste to the CMD window.
[ Note: The spacing here must be exact, as shown here. There is one Space between each word except the " = " following the " = " there is no spacing - Example- " ssid=Change " ]
netsh wlan set hostednetwork mode=allow ssid=Mickspacenet key=mypassword keyUsage=persistent
-
Once copied, pasted into Cmd then press Enter, you should receive the following.
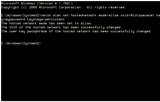
C:\Windows\System32>netsh wlan set hostednetwork mode=allow ssid=Mickspacenet key=mypassword keyUsage=persistent The hosted network mode has been set to allow. The SSID of the hosted network has been successfully changed. The user key passphrase of the hosted network has been successfully changed. C:\Windows\System32>
Your Vwifi is now set up and almost ready to use. Now we have to start the service.
-
Paste this line into the Cmd Line.
netsh wlan start hostednetwork
This will start the service. You should receive the following message.
C:\Windows\System32>netsh wlan start hostednetwork The hosted network started.
Your Vwifi should now be broadcasting.
to check the set up type into the Cmd Line
Once Cmd window is Open 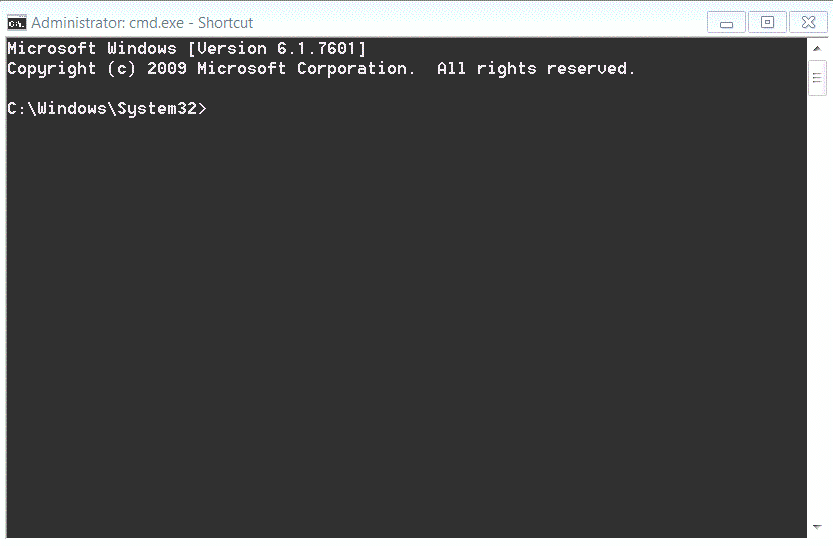 a Black Window should appear.
~ It is possible to copy and paste this text, it is best to copy and Paste into NotePad, then into the CMD window ( Start Menu\Programs\Accessories\notepad ) Copy the lines here into Notepad, then reselect and copy and paste into the Cmd Window. Copying and Pasting is the easiest way to accomplish the following task~
netsh wlan show hostednetwork
You should receive the Following:
C:\Windows\System32>netsh wlan show hostednetwork
Hosted network settings
-----------------------
Mode : Allowed
SSID name : "Mickspacenet"
Max number of clients : 100
Authentication : WPA2-Personal
Cipher : CCMP
Hosted network status
---------------------
Status : Started
BSSID : 00:27:14:ab:ee:3d
Radio type : 802.11g
Channel : 10
Number of clients : 0
C:\Windows\System32>
open the Network and Sharing Center and look at the adapters
The Microsoft Virtual Wifi Miniport Adapter should show what ever it is you named the SSID.
From a device or a different PC, attempt to connect to to your new broadcasting network.
Below are a few commands which control the "netsh wlan" Command.
------------------------------------------------------
netsh wlan start hostednetwork
This will start the Network
------------------------------------------------------
netsh wlan stop hostednetwork
This will stop the network broadcasting.
------------------------------------------------------
netsh wlan show hostednetwork
This will show the network information
------------------------------------------------------
netsh wlan show hostednetwork setting=security
This will show the security Key.
------------------------------------------------------
Once this is set up and you are able to connect, the PC will save the settings, in the future if you want to to start or stop the service, simply do the start or stop command or Disable the Virtual Miniport Adapter in Network and Sharing Center.
The alternative to starting and stopping the service is creating a bat file or a short cut. I have created a Two short cuts, one to start, one to stop. You can download that below here.
Warning:
This worked beautifully on my PC there is no grantee this will work on your PC. You can how ever make your own short cut, in the Target entry place this line to start the service-" C:\Windows\System32\netsh.exe wlan start hostednetwork " Place this line to stop the service -" C:\Windows\System32\netsh.exe wlan stop hostednetwork "
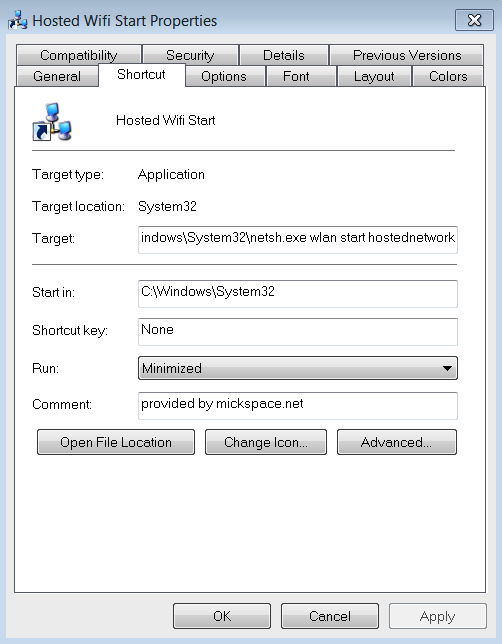
To download shortcuts Right Click and Choose Save Target As: Once downloaded change the extension from .txt to .lnk (LNK)
More Information Netsh Commands for Wireless Local Area Network (WLAN)
"netsh wlan" is the command we used here, typing "netsh wlan help" shows help information.
all the commands here are preceded by "netsh wlan"
C:\Windows\System32>netsh wlan help
The following commands are available:
Commands in this context:
? - Displays a list of commands.
add - Adds a configuration entry to a table.
connect - Connects to a wireless network.
delete - Deletes a configuration entry from a table.
disconnect - Disconnects from a wireless network.
dump - Displays a configuration script.
export - Saves WLAN profiles to XML files.
help - Displays a list of commands.
refresh - Refresh hosted network settings.
reportissues - Generate WLAN smart trace report.
set - Sets configuration information.
show - Displays information.
start - Start hosted network.
stop - Stop hosted network.
To view help for a command, type the command, followed by a space, and then
type ?.
C:\Windows\System32>
-------------------------------------------------------------------------------------------------------------
netsh wlan show command
C:\Windows\System32>netsh wlan show
The following commands are available:
Commands in this context:
show all - Shows complete wireless device and networks information.
show allowexplicitcreds - Shows the allow shared user credentials settings.
show autoconfig - Shows whether the auto configuration logic is enabled or
disabled.
show blockednetworks - Shows the blocked network display settings.
show createalluserprofile - Shows whether everyone is allowed to create all
user profiles.
show drivers - Shows properties of the wireless LAN drivers on the system.
show filters - Shows the allowed and blocked network list.
show hostednetwork - Show hosted network properties and status.
show interfaces - Shows a list of the wireless LAN interfaces on
the system.
show networks - Shows a list of networks visible on the system.
show onlyUseGPProfilesforAllowedNetworks - Shows the only use GP profiles on GP
configured networks setting.
show profiles - Shows a list of profiles configured on the system.
show settings - Shows the global settings of wireless LAN.
show tracing - Shows whether wireless LAN tracing is enabled or disabled.
C:\Windows\System32>
For more Details and Help Google " Netsh Commands for Wireless Local Area Network (WLAN) "
This is a link to Microsoft Article Netsh Commands
Questions, Comments, Concerns, Please Click here for the Forum
MMXII Copyright © mickspace.net - All Rights Reserved -